
Scenario Painting in Envision Tomorrow
Installing the ArcGIS Add-In
Since ET is an extension tool for ArcMap, it should be installed before using it in the ArcGIS system.
1. Download the ET software (a zip file) and extract files.

2. Once extracted, double click the setup.exe file to initiate the installation process.

3. You will be prompted to confirm your settings. Click ‘Next’ and follow the instruction to install the ET software.

4. Click ‘Close’ to finish installing the software.

Now, ET is ready to use.

Adding the Envision Tomorrow Toolbar
To show the ET toolbar, you click the menu ‘Customize’ – ‘Toolbars.’ In the menu ‘Toolbars’, there is a toolbar named ‘Envision Tomorrow.’
Now, you will see the ET toolbar at the top of ArcMap. When you click the ‘ET paint tool’, another window will pop up the screen. However, for your convenient use of the ET tool, it would be better to place the toolbar on the left side of ArcMap workspace.
Tool Menus
Envision Paint Tools Menus
The Envision Tomorrow paint tool interface consists of three separate menu sections: File, Edit Scenarios, and Subareas. Also, there are four icons beneath the menu bar, which play a role in painting and editing scenarios.

When you create scenarios by using ET, most of the functions you will need can be found in the File menu. In the File menu, there are six sub-menus – Open Envision File Geodatabase, Define Scenario Layers, Open Envision Excel File, Synchronize Data, Attribute Field Manager, and Tools. The following figure explains the functions that relate to basic scenario painting tasks in ET:

Under the Open Envision Excel File, Synchronize Data, and Tools sub-menus, there are several detailed functions. Functions of these three sub-menus can be summarized in the following figures.
Note: Before opening an Envision file geodatabase, the five submenu functions (Define scenario Layers, Open Envision Excel File, Synchronize Data, Attribute Field Manager, and Tools) are not activated.
Envision Tomorrow and the ArcMap UI
The ET within the ArcMap UI consists of four parts:
- ET Extension Toolbar
- Development Type Palette
- ET Status Bar
- Mapping (Scenario Visualization) Area

The toolbar, overviewed in the section above, deals with loading data, scenario synchronization, and other painting-related tasks. The Development Type Palette, visible below the toolbar, will display a list of color-coded development types once a scena viewer window for ArcMap where you scenario featureclass will display and where scenario painting occurs. Since ET is an extension tool of ArcGIS that uses geodatabase file structure, it can also interact with ArcGIS functions.
Adding Data
Building a New Scenario Geodatabase
For this step, you should already have a file geodatabase containing your scenario polygon featureclass, populated with relevant ET fields. If you do not, see the section of the user guide that deals with project setup.
The first step is to open your Envision file geodatabase file in ArcMap. When you first open your new Envision file geodatabase, ET performs several functions behind the scenes as follows:
- Generates several tables within the geodatabase for tracking scenario results.
- Generate a list of all layers included in the geodatabase – each layer is a potential scenario layer.

Under the ‘File’ menu in ArcMap, select ‘Open Envision File Geodatabase.’ You will see another window pop up at the center of the screen. Select your file geodatabase and click the ‘Add’ button.
Notice that ET builds a series of tables within your geodatabase which become visible in the ‘Table Of Contents’ window in ArcMap. These tables hold key attribute values populated from your scenario spreadsheet. When a user paints in ET, the acres of vacant and developed land are multiplied against these attributes depending on the type of development painted.
Linking the Scenario Builder spreadsheet
After you open your Envision file geodatabase, you will be automatically prompted to select an Excel Scenario Builder spreadsheet file. By linking the scenario spreadsheet file with the ET+ scenario tables, data related to the painted area in ET+ will be written in both the scenario layer you work on and the scenario spreadsheet.

Note: once your Scenario Builder spreadsheet opens, you may be prompted to update linked values. It is usually best to select “no” as we can assume that linked values in your spreadsheet (building prototype sheets, for example) are up-to-date.
Then, ET starts retrieving and checking required scenario datasets that are included in the scenario spreadsheet. In the Envision Paint Tools, you will find that several symbols (colors) are added according to development types. This process can take up to five minutes.
Defining your Scenario Layer
After finishing retrieving and checking the data in the scenario spreadsheet, you will see another message in ArcMap – ‘Defining the Scenario Layer.’ When you open your Envision file geodatabase for the first time, ET does not recognize which scenario layer you like to work on. Therefore, you need to determine which scenario layer you want to work. For now, click ‘OK’ to define your scenario layer.


To define your first scenario layer, select the ‘File – Define Scenario Layers – Scenario 1’ in the Envision Paint Tools. When you select the ‘Scenario1’, you see the scenario featureclass(es) you included in your file geodatabase. Select the featureclass that corresponds to scenario 1. From this point on, ET will remember your selection and add the ‘Scenario_1’ featureclass. Also, in the ‘Table Of Contents’ window and the Envision Paint Tools, symbols (colors) for each development type are shown. You can perform this operation for up to 4 additional scenario "slots".
Opening a Previously Created Scenario Geodatabase
If you open your file geodatabase that you already edited before, ET does not create scenario layers or tables again because you already made them when you open your file for the first time. Also, ET does not automatically load a scenario spreadsheet because it does not know which scenario spreadsheet you used last time. If you painted areas in the target site, the work area in ArcMap will show painted areas that you created during your last session. In order to view metrics, make sure to re-link your scenario spreadsheet through the “Open Envision Excel File” dialog.

Scenario Painting
Scenario painting is the act of applying development types to your scenario featureclass, whether through active selection using the paint tools, or through feature queries. The general workflow is as follows:
- Select a development type
- Select a paint tool or construct a feature query
- Double click to apply your painting or click the "apply" button to apply painting to your queried polygons
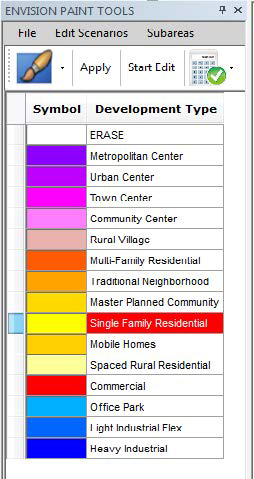
Select a Development Type
First, select a development type from the Development Type Palette by clicking on it:
Scenario Painting Tools
The Envision Tomorrow UI has several built in "paint brushes" that can be accessed from the ET toolbar:

First, use the drop-down menu associated with the brush tool to select your preferred brush. Then, click on the brush tool icon and begin to paint on the View Window in ArcMap:

Painting by Query
Since Envision Tomorrow is an add-in for ArcMap, users can also paint by performing basic feature queries. To do this, go to the "selection" menu in ArcMap and click "select by attributes". In the resulting query window type an SQL query. If desired, you can then use the "apply" button to apply the selected development type to the queried features.

Editing Scenarios
This section will explain how to edit your scenarios. ET provides following editing functions so that users can edit their scenarios easily:
- Synchronize Data Menu: Quick Sync/Full Sync/Existing Condition Sync
- Erasing the painted areas
- Choosing a new scenario layer and painting it

Editing Mode
Users can choose to paint their scenarios inside our outside of an edit session. If painting is done during an edit session, the user must specifiy when they would like their edits saved and can also end their edit session without saving.
Note: Painting typically goes faster within an edit session, however if for some reason ArcMap closes or a paint session is ended prematurely, all painting will be lost.
Spreadsheet Synchronization
Once you have linked your Scenario Builder spreadsheet, what you paint in Envision Tomorrow should be reflected in your Scenario Builder spreadsheet. However, it is possible for your spreadsheet and ET scenario to fall out of sync. To ensure that this is not occuring, it is encouraged that you periodically perform a full or quick sync on your Scenario Builder spreadsheet. To do this, browse to the ET file menu, and select the desired sync type as defined below:

It is also possible to toggle spreadsheet sync on and off by using the "write-to" interface on the ET Toolbar:

Erasing Painted Cells
If you would need to remove development from a specific area, you can use the ERASE function within the Development Type Palette. Use this just as you would a development type - either applying with a paint brush or through a feature query. Notice that as you remove development from you scenarios you will see commensurate decreases in your scenario spreadsheet.
Selecting a New Scenario Layer
Envision Tomorrow makes it easy to create new scenarios or to toggle between up to five pre-created scenarios. Simply use the "Edit Scenarios" drop-down menu to select one of up to five scenarios within your scenario geodatabase.
Note: Separate featureclasses for each scenario must exist within your scenario geodatabase. You must also pre-link each scenario featureclass with each scenario "slot" so ET knows which featureclass to load when you chance scenarios.
Sub Area Definition
The sub area definition tool allows users to focus their scenario painting in one or a handful of areas. The sub area query is based on an attribute within the scenario featureclass and works very much like a definition query. The user specifies the attribute to use as a query, and then the tool pulls the unique occurrences of that attribute. The user then selects the unique occurrence upon which to base the sub area definition. The tool then limits the scenario to only the polygons that satisfy the query.

Attribute Field Manager
The attribute field manager is used for advanced scenario analysis and writing scenario outputs to your scenario featureclass. For more information on this tool, see the section on scenario analysis.
Tools Menu
The tools menu contains many of the spatial analysis tools included in the Envision Tomorrow suite. For more information about individual analysis tools, see the analysis tools section.